You use an eye mark to help machines cut and track packaging with accuracy during roll stock printing. BN PACK’s experience shows that strong color contrast, smart placement, and sensor accuracy make your production smoother and reduce waste. BN PACK’s rolls film packaging gives you a reliable and customizable choice for high-speed operations. You can follow proven steps to design eye marks that work well for your needs.
Eye Mark Basics in Roll Stock Printing

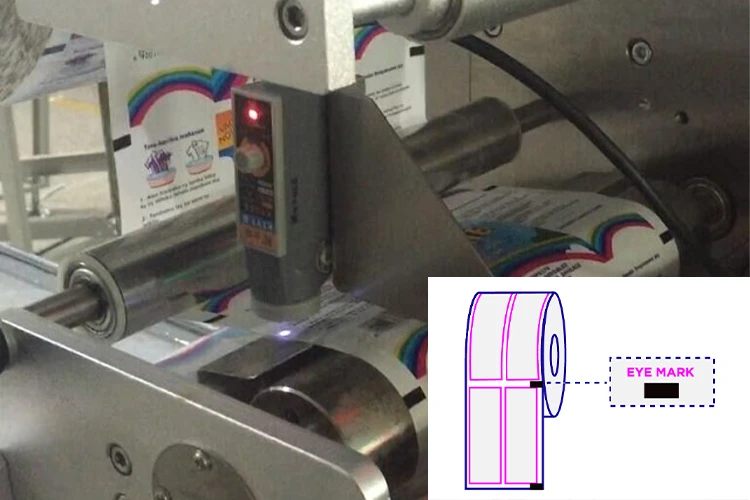
What Is an Eye Mark?
You see an eye mark every time you look at packaging film used in roll stock printing. This small printed mark acts as a guide for machines. It helps the equipment know exactly where to cut, seal, or decorate each package. The eye mark stands out from the rest of the design, making it easy for sensors to spot during fast production.
A machine-recognizable mark, printed on web-fed packaging materials. The eye-mark is the reference point from which the machine will register other operations such as further decoration, heat sealing, or package cutoff.
You can think of the eye mark as a traffic signal for packaging machines. It tells the system when to start and stop each step. This simple mark keeps your packaging process running smoothly.
Why Eye Marks Matter for Automation
You want your packaging line to work quickly and accurately. Eye marks make this possible. When you use roll stock film, machines rely on these marks to keep every package the same size and shape. The sensors read each eye mark and trigger the next action, such as cutting or sealing.
If you skip using eye marks, your packages might not line up. You could end up with wasted material or products that do not look right. Eye marks help you avoid these problems. They let you run your machines at high speed without losing control. You save time, reduce waste, and get better results.
You can trust eye marks to keep your automated systems working well. They give you the precision you need for every package, every time.
Technical Requirements for Eye Mark Design

Size and Color Contrast Guidelines
You need your eye mark to be easy to see. The right size and color help sensors find it fast. Most eye marks are small rectangles near the film’s edge. Pick a color that is very different from the background. For example, use black on light or white on dark. This makes the mark stand out for the sensor.
Here is a table with the main standards for eye mark design:
Standard | Description |
|---|---|
High-contrast visibility | The mark must be easy to see against the background. |
Precise placement | Position the mark accurately near graphics and cut lines. |
Compatibility with sensors | Make sure the mark works with your machine’s sensors. |
Keep space around the eye mark clear. Do not put graphics or text too close. This helps the sensor see the mark better. If you use coated papers or films, the print is sharper. Sensors can read these marks more easily. Coated materials also make the machine run cleaner and faster.
Tips for better results:
Use a rectangle shape for the eye mark.
Pick a color that pops from the background.
Put the mark near the edge, away from busy designs.
Placement and Alignment Strategies
You must put the eye mark in the right place. This helps sensors work well. Where you put the mark changes how the machine cuts and seals. If the mark is too close to other things, the sensor might get confused. If it is too far from the cut line, the machine may miss the spot.
Follow these steps for good placement:
Teach your sensor to see the eye mark before you start.
Put the mark so it lines up with the cutting or sealing point.
Keep the mark inside the right limits to stop mistakes.
Here is a table with the best tolerances for alignment:
Tolerance Type | Measurement |
|---|---|
Horizontal Position | ± 1.5 mm |
Vertical Position | ± 2.0 mm |
Rotation from Vertical | < 2 degrees |
Sensors work best if you follow these rules. Contrast sensors see high-contrast marks quickly. True color sensors can see more colors but need more setup. Luminescence sensors use special inks for extra safety. Dual-mode sensors mix features for more options.
Sensor selection tips:
Pick sensors that react fast (under 1 ms).
Make sure the sensing distance fits your machine.
Choose sensors with a strong rating (IP67 or higher).
You can stop mistakes by keeping the eye mark clear and lined up. Good placement and training help your line run fast and smooth. BN PACK’s rolls film packaging meets these standards, so you get good results every time.
Overcoming Common Eye Mark Challenges
Print Registration Issues
Sometimes, print registration problems can mess up your packaging. These problems happen if the eye mark is missing or hard to see. Machines need the eye mark to know where to cut and seal. If the mark is not there or is unclear, you get uneven packs and waste film. Here are some reasons why this happens:
No eye mark in your design makes things line up wrong.
Cutting goes wrong when the eye mark is not there.
The sensor cannot find the mark, so packs turn out uneven.
You can stop these problems by checking your design before you start. Make sure every roll of film has a clear, easy-to-see eye mark. Teach your team to look for the marks during setup and while running the machine.
Consistency in Production Runs
You want every package to look the same, even if you make a lot. Consistency starts with good printing and skilled workers. Offset printing uses metal plates and a rubber blanket to move ink. This way, you get sharp details and good results for big batches. Skilled press operators use special tools to check color and keep every mark right.
Method | Description | Benefits |
|---|---|---|
Offset Printing | Uses metal plates and a rubber blanket for sharp details. | Great print quality and keeps things the same for many packages, saves money for big jobs. |
Professional Press | Skilled workers use tools to check color during printing. | Makes sure colors match, which is important for brands and customers. |
Pick printing partners who use these ways. Regular checks and color fixes help keep eye marks the same from start to finish.
Avoiding Sensor Errors
Sensors are important for reading eye marks. You need to set up sensors right and keep them clean. Dust or ink can block the sensor’s view. Clean sensors often and check if they are lined up. Use sensors that work fast and fit your machine’s speed. If you see mistakes, retrain the sensor and move the mark if needed. Dual-mode sensors can help make things more reliable.
Tip: Always test your sensors before you start a new job. This easy step helps you find problems early and keeps your line working well.
Best Practices with BN PACK Rolls Film Packaging

Customization for FFS Systems
You want your packaging line to run fast and smooth. BN PACK’s rolls film packaging gives you flexible options for vertical and horizontal form-fill-seal (FFS) systems. You can choose the right film width, thickness, and barrier properties for your product. BN PACK lets you pick from clear, frosted, or printed windows to show off your goods. You can add features like tear notches, zippers, or spouts for easy use.
When you design eye marks for FFS machines, you should match the mark’s size and color to your sensor’s needs. BN PACK’s technical team helps you select the best contrast and placement. You get high-definition printing that makes eye marks stand out. The film’s smooth surface keeps marks sharp and easy for sensors to read. You can trust BN PACK to guide you through every step, from artwork setup to final production.
Tip: Always share your machine’s sensor specs with BN PACK. This helps you get eye marks that work perfectly with your equipment.
Testing and Validation Steps
You need to make sure your eye marks work before you start mass production. Follow these steps to test and validate your design:
Define your machine’s requirements. Check the sensor’s preferred eye mark size, position, and color contrast.
Review your artwork early. Place the eye mark in a clear area, away from seams or busy graphics.
Run a small-batch test. Fill and seal a short run to check if the sensor detects the eye mark every time.
You should watch for any missed marks or sensor errors during the test. If you see problems, adjust the mark’s color or placement. BN PACK’s team can help you tweak the design for better results.
Step | What You Do | Why It Matters |
|---|---|---|
Machine Setup | Match eye mark specs to your sensor | Ensures reliable detection |
Artwork Review | Keep eye mark in a clear, visible spot | Prevents interference |
Small-Batch Test | Check detection and stability | Avoids waste and miscuts |
Note: Regular validation keeps your line running smoothly. You save time and reduce waste with every batch.
You can get accurate cutting and tracking if you use these tips for eye mark design:
Pick colors that stand out and put the mark in a clear spot.
Check and test your marks often to make sure they work.
Ask experts for help if you need it.
BN PACK’s rolls film packaging gives you good choices and advice from experts. You can make your production faster and waste less by using their special films. Look at what BN PACK offers to make your packaging line better.